Question List in August, 2021
🔥 This summer has no different from the others except some boring and peaceful stories.
观自在菩萨,行深般若波罗蜜时,照见五蕴皆空,度一切苦厄。舍利子,色不异空,空不异色,色即是空,空即是色,受想行识,亦复如是。舍利子,是诸法空相,不生不灭,不垢不净,不增不减。是故空中无色,无受想行识,无眼耳鼻舌身意,无色声香味触法,无眼界,乃至无意识界,无无明,亦无无明尽,乃至无老死,亦无老死尽。无苦集灭道,无智亦无得,以无所得故。菩提萨埵,依般若波罗蜜多故,心无罣碍,无罣碍,故无有恐怖,远离颠倒梦想,究竟涅槃;三世诸佛,依般若波罗蜜多故,得阿耨多罗三藐三菩提。故知般若波罗蜜多,是大神咒,是大明咒,是无上咒,是无等等咒,能除一切苦。真实不虚,故说般若波罗蜜多咒,即说咒曰:揭谛揭谛,波罗揭谛,波罗僧揭谛,菩提萨婆诃。
1 能源集团大屏系统
天津能源投资集团有限公司于 2013 年 6 月在天津市市场和质量监督管理委员会登记成立。法定代表人李庚生,公司经营范围包括对能源资源开发经营及对电力、热力、燃气、水的生产和供应相关产业进行投资等。本月依据相关会议精神和文件要点,对上月要点进行具体设计实现。
1.1 相关功能
近日需要执行的相关内容有:
直方图选中并显示具体值
[ 解决方案 in 2021-08-04 15:39 by Long. ]
在使用 WebGLGlobeDataSource 创建 Box 这一实体 Entity 时,使用 mars3d 的相关技术基础为 entity 添加 tooltip 属性,使其几何实体在鼠标滑过显示参数面板:
let entity = new Cesium.Entity({});
entity.tooltip = {
    html: '任意 html',
    anchor: [0, 0] //锚点
}
热力图图签密度的细节调整;
热力图展绘时精灵半径大小的细节调整;
直方图展绘时柱体高度及半径的细节调整;
负荷区域的动态标绘与动态删除;
[ 解决方案 in 2021-08-06 9:57 by me.]
通过查找火星科技提供的 Mars3D 使用 API 文档,找到了 layer 图层处理类,BaseLayer 图层控制基类和 GeoJsonLayer 衍生类,通过以下代码来创建、定位和销毁图层:
let layer = mars3d.layer.createLayer({}, viewer);
layer.centerAt();//定位
layer.destroy();//销毁
热力图异步请求数据的等待处理,即等待获取所有数据,考虑接入接口后使用 async 为 false 执行同步查询,但这个同步查询需要使用一次性的多 ID 通用查询;
参数平铺工作;
数据服务发布工作。
[ 相关工作 in 2021-08-23 15:50 by me. ]
能源集团相关数据服务的发布工作主要包括:a. 中心城区范围内三百平方公里的倾斜摄影测量三维模型;b. 高清正射影像的服务发布工作;c. 高德暗夜底图的发布工作以及矢量蓝模的发布工作;
其中三维模型以及矢量蓝模都考虑在服务器利用 IIS 发布 3dtiles 服务即可,而有关影像数据的发布工作则考虑后面应用 geoserver 进行发布,可询问志哥或雪饼如何发布。
影像发布可以用 Portable Basemap Server,也即 PBS 进行发布,但跨域时无法解决该问题;故而退而求其次选择用 Geoserver 发布 Geowebcache 影像服务进行发布;经雪饼介绍参考博客 10-11。
1.2 技术总结
本章的技术要点主要包括 ajax 请求的相关处理、Mars3D 中 plotGeojson 配置的源码处理方式等等。
寻找 plotGeojson 的绘制方式
通过全局搜索,定位到文件 plotGeojsonLayer.js,查看其代码,似乎可以根据这个文件进行相关函数的编写来实现负荷区域范围等内容的展绘。通过查阅 Mars3D 两个版本的 API 说明文档,发现官网的 API 封装了许多新的图层和函数以提供对相关内容的支持,而这样一看我们的版本较低,与官网最新版本有较大差距。在后续工作中可能需要根据情况选择:
Mar3D 早期版本中有一个 DivPoint 类可以使用。
JavaScripit Blob
一直以来,JS 都没有比较好的可以直接处理二进制的方法。而 Blob 的诞生解决了这一问题,其允许用户通过 JS 直接操作二进制数据。Blob 对象可以看做是存放二进制数据的容器,其支持设置二进制数据的 MIME 类型。
一个Blob对象就是一个包含有只读原始数据的类文件对象。Blob对象中的数据并不一定得是JavaScript中的原生形式。File接口基于Blob,继承了Blob的功能,并且扩展支持了用户计算机上的本地文件。
通过以下代码可以实现:将 JS 代码中创建的 JSON 字符串变为 URL 提供给所需要的对象。
/**
 * 通过Blob对象为json生成前端URL地址
 * @param data
 * @param filename
 */
function saveJSON(data, filename) {
    if (!data) {
        console.log('[ERROR] 生成的区域边界为空.');
        return;
    }
    if (!filename) filename = 'json.json'
    if (typeof data === 'object') {
        data = JSON.stringify(data, undefined, 4)
    }
    let blob = new Blob([data], {type: 'text/json'});
    return window.URL.createObjectURL(blob);
}
jQuery 动态拉出
相关代码用到了动画,主体为:
$("#somediv").animate({left: 0}, "slow");
jQuery 模糊查询
通过查阅资料,根据属性进行模糊查询的方法是:
$("div[id*='aa']");
而若需要通过 innerText 属性进行查询则需要使用如下方法:
$("div:contains('aa')");
由此记录一下踩过的坑。
设置允许滚动条
设置滚动条的代码:
{  /*设置允许滚动条*/
    overflow-y: scroll,
    max-height: 300px
}
EarthSDK 绘制 Scanline
EarthSDK 创建对象有一套通用的代码,这个照比初始版本的 Mars3D 要强上很多,其设置过程总体遵循两步走的策略,先声明是什么类型,然后再通过函数加载配置文件并添加到程序中,需要注意在使用完相关对象后可以用销毁函数对绘制内容进行销毁:
let obj = new XE.Obj.Scanline(earth);//声明对象类型
obj.xbsjFromJSON(config);//根据配置文件创建对象
obj = obj && obj.destroy();//销毁对象
由此,即可在程序中根据 EarthSDK 对不同对象的配置手册来手动绘制相关内容。
Chosen 遍历多选内容
jQuery 的 eq(index) 函数将从指定元素集中找到索引为 index
的那一个,通过这个函数可以遍历相关的元素。然后通过博客知道,原来
Bootstrap 中直接通过 val()
函数就可以获取到所有参数列表了哦,日了狗狗。
参数平铺
在使用 $.ajax() 请求的过程中发现了自己的不足:即 contentType
告诉客户端实际返回的内容的内容类型;而 dataType
则告诉服务端客户端所发送的请求是什么类型的,比如 JSON
格式。这是个很丢人的问题,在海心公司的帮助下解决了这个问题。关键是,加了
Content-Type 为什么会引起下面的错误?
Access to XMLHttpRequest at ‘http://172.16.87.12:8399/api/WebApi/GeographicInfoApi/Geographic/NodeParameters’ from origin ‘http://localhost:63342’ has been blocked by CORS policy: Response to preflight request doesn’t pass access control check: It does not have HTTP ok status
就很莫名其妙,删除了 Content-Type
代码反而能用了。通过博客园的博客简单了解了下 Ajax 的 contentType和
dataType 的异同:
contentType:默认为application/x-www-form-urlencoded发送信息至服务器时的内容编码类型;在Form元素的语法中,EncType表明提交数据的格式 用 Enctype 属性指定将数据回发到服务器时浏览器使用的编码类型。application/x-www-form-urlencoded: 窗体数据被编码为名称/值对,这是标准的编码格式。multipart/form-data: 窗体数据被编码为一条消息,页上的每个控件对应消息中的一个部分。text/plain: 窗体数据以纯文本形式进行编码,其中不含任何控件或格式字符。Form 的 Enctype 属性为编码方式,常用有两种:application/x-www-form-urlencoded 和 multipart/form-data,默认为application/x-www-form-urlencoded;当 Action 为 GET 时候,浏览器用默认的编码方式把form 数据转换成一个字串(name1=value1&name2=value2…),然后把这个字串 Append 到 URL 后面,b并用
?分割,加载这个新的url;当 Action 为 POST 的时候,浏览器把 Form 数据封装到 HTTP body 中,然后发送到 Server。如果没有
type=file的控件,用默认的 application/x-www-form-urlencoded 就可以了, 但是如果有type=file的话,就要用到 multipart/form-data 了。浏览器会把整个表单以控件为单位分割,并为每个部分加上 Content-Disposition(form-data或者file),Content-Type(默认为text/plain),name(控件name)等信息,并加上分割符(boundary)。dataType:预期服务器返回的数据类型,不指定时 jQuery 将自动根据 HTTP 包的 MIME 信息来智能判断。
火星坐标系
高德使用 GCJ-02 火星坐标系,
参考文献
博客园.HTML5 Blob对象[EB/OL].
CSDN博客.如何用js将blob对象或json对象转file对象[EB/OL].
博客园.css3单个元素实现圆角tab[EB/OL].
OSChina.jquery.chosen.js多选下拉框不消失的方法[EB/OL].
CSDN博客.如何获取 chosen chosen.jquery.js 选中的值[EB/OL].
博客园.bootstrap下拉列表多选组件[EB/OL].
Github.Chosen[EB/OL].
博客园.Ajax请求中,contentType和dataType的区别[EB/OL].
CSDN博客.application/x-www-from-urlencoded与application/json[EB/OL].
2 部署服务
2.1 部署 BIM 后台服务
部署 BIM 模型服务地址管理操作系统,主要工作包括:
安装 maven 3.6.3 版本,打包分离版若依框架的 jar 包(分离版需要打包所有的 jar 包并运行 ruoyi-admin.jar 包才能正确执行起来,本地测试运行成功);
配置 60.28.130.106 服务器上的 postgres 数据库的 pg_hba.conf 文件,在其 IPv4 注释行添加远程数据库远程链接 IP 白名单
host all all 60.28.156.80/24 trust以允许文件链接;利用 Navicat 执行数据库迁移:先创建数据库 ruoyi-cloud,再用 [工具] 中的 [结构同步] 同步表结构及序列,最后使用 [工具] 中的 [数据同步] 同步两个数据库中的所有数据;
- 拷贝相关 jar 包到 ftp://60.28.130.106:201 服务地址,匿名登录后在服务器端试运行。此处需要检查端口 8080 是否被占用,如被占用需要更改相关端口,检查端口占用的相关代码是:检查端口:
netstat -ano|findstr "端口号";检查被谁占用了:tasklist|findstr "进程id号"; 查看 Navicat 保存的密码可以参考相关参考文献。
2.2 发布二维图像服务
经过查阅和问询,发布二维地图服务主要有这几种策略:Geoserver、ArcGIS Server 以及 Portable Basemap Server 等。PBS 无法解决跨域问题,Geoserver 可以通过 Geowebcache 发布 ArcGIS 切片缓存;而 ArcGIS Server 暂时还没试,需要注意的是,geowebcache 的用户名和密码在 WEB-INFusers.properties 中,用户名密码分别为:geowebcache 和 secured。修改后,需要将 geowebcache 发布服务的坐标系指定为 EPSG:3758。
“crs”: “EPSG:3758”
至此,解决 Geowebcache 发布二维图像服务时的跨域问题。而 ArcGIS Server 的跨域问题参考博客 4 中的 jar 包方式进行调试发现重启计算机后可以发布,现将调整过程简要记录如下:
跨域问题 同源策略会阻止一个域的 JavaScript 脚本和另外一个域的内容进行交互,这里所谓的同源是指在同一个域,也即两个页面具有相同的 Protocol,Host 和 Port,译为协议、主机和端口号。
问题本质 ArcGis Server 的服务容器是 Tomcat,所以要解决的问题是 Tomcat 的跨域问题,也就是说原始文件夹中缺失了 cors-filter-1.7.jar 和 java-property-utils-1.9.1.jar 两个 Jar 包。
解决策略 所以要解决这个问题只需要将两个 Jar 包对应拷贝到 \ArcGISServerframeworkruntimetomcat 路径下,并编辑 Tomcatconfweb.xml 文件即可:
<filter>
    <filter-name>CORS</filter-name>
    <filter-class>com.thetransactioncompany.cors.CORSFilter</filter-class>
    <init-param>
        <param-name>cors.allowOrigin</param-name>
        <param-value>*</param-value>
    </init-param>
    <init-param>
        <param-name>cors.supportedMethods</param-name>
        <param-value>GET, POST, HEAD, PUT, DELETE</param-value>
    </init-param>
    <init-param>
        <param-name>cors.supportedHeaders</param-name>
        <param-value>Accept, Origin, X-Requested-With, Content-Type, Last-Modified</param-value>
    </init-param>
    <init-param>
        <param-name>cors.exposed.headers</param-name>
        <param-value>Access-Control-Allow-Origin,Access-Control-Allow-Credentials</param-value>
    </init-param>
    <init-param>
        <param-name>cors.exposedHeaders</param-name>
        <param-value>Set-Cookie</param-value>
    </init-param>

    <init-param>
        <param-name>cors.supportsCredentials</param-name>
        <param-value>true</param-value>
    </init-param>
</filter>
<filter-mapping>
    <filter-name>CORS</filter-name>
    <url-pattern>/*</url-pattern>
</filter-mapping>
参考文献
Yinuan. 查看Navicat已保存数据库密码[EB/OL].
CSDN博客.GeoServer 调用 Arcgis 切片[EB/OL].
CSDN博客.`Geoserver入门操作系列之一:发布地图服务 <>`__[EB/OL].
CSDN博客.解决 ArcGIS Server 跨域问题[EB/OL].
3 矢量查询功能
关于矢量查询的代码,在深入研究的基础上发现其使用代码如下:
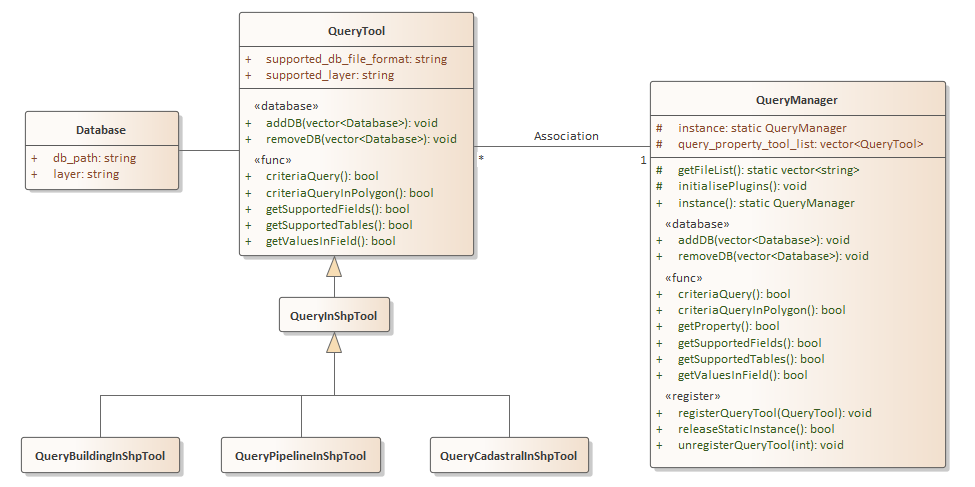
矢量查询代码是继承于 QueryInShpTool 而写的代码。继承的方法直接可以在子类中使用;而我们所要做的就是利用 QueryManager 来管理一系列查询插件,通过查询插件的注册来实现具体的功能。总而言之,先添加待查询数据并注册查询工具,随后即可调用查询获取相关属性。
4 调整热力图悬空
4.1 热力图悬空使用的代码
参考 MarsGIS 的示例代码 ”热力图几何对象.html”,位于 MarsGisPlatform 项目中的 example 文件夹中,使用时可参考如下初始代码:
<!-- 2018-12-8 15:17:10 | 版权所有 火星科技
http://marsgis.cn
【联系我们QQ:516584683,微信:marsgis】
-->
<!DOCTYPE html>
<html>
<head>
    <title>热力图(几何对象)</title>
    <script src="../lib/include-lib.js" libpath="../lib/"
            include="jquery,font-awesome,bootstrap,layer,haoutil,turf,cesium-cim"></script>
    <link href="css/style.css" rel="stylesheet">
</head>
<body>
<div id="mask" class="signmask" onclick="removeMask()"></div>
<div id="cesiumContainer" class="cesium-container"></div>
<div class="heatmap" style="overflow:hidden;width:840px;height:400px">
    <div class="heatmap-canvas" width="800" height="400"></div>
</div>
<script src="../lib/CesiumPlugins/heatmap/heatmap.min.js"></script>
<script>function removeMask() {
    $("#mask").remove()
}
var viewer;
function initMap() {
    var e = haoutil.system.getRequestByName("config", "config/config.json");
    mars3d.createMap({
        id: "cesiumContainer", url: e, success: function (e, t, a) {
            viewer = e, setTimeout(removeMask, 3e3), initWork()
        }
    })
}
function getRandomPoints(e, t) {
    for (var a = [], r = turf.randomPoint(e, {bbox: t}).features, n = 0; n < r.length; n++) {
        var i = r[n].geometry.coordinates, o = Math.floor(100 * Math.random());
        a.push({x: i[0], y: i[1], value: o})
    }
    return a
}
function initWork() {
    viewer.mars.centerAt({y: 31.794428, x: 117.235343, z: 2351.9, heading: 1.6, pitch: -28.8, roll: 0});
    var e = 117.226189, t = 117.245831, a = 31.828858, r = 31.842967, n = getRandomPoints(200, [e, a, t, r]), i = Cesium.Rectangle.fromDegrees(e, a, t, r), o = turf.radiansToLength(i.width, "metres"), s = turf.radiansToLength(i.height, "metres");
    $(".heatmap").css({width: o + "px", height: s + "px"}), $(".heatmap-canvas").css({
        width: o + "px",
        height: s + "px"
    });
    for (var m = [], u = 0, c = 0; c < n.length; c++) {
        var l = n[c], p = Cesium.Math.toRadians(l.x - e), g = Cesium.Math.toRadians(r - l.y);
        p = Math.round(turf.radiansToLength(p, "metres")), g = Math.round(turf.radiansToLength(g, "metres")), m.push({
            x: p,
            y: g,
            value: l.value
        }), u = Math.max(u, l.value)
    }
    var d = {max: u, data: m};
    h337.create({
        container: document.querySelector(".heatmap"),
        gradient: {.25: "rgb(0,0,255)", .55: "rgb(0,255,0)", .85: "yellow", 1: "rgb(255,0,0)"}
    }).setData(d);
    var h = document.getElementsByClassName("heatmap-canvas")[1].toDataURL("image/png");
    h337.create({
        container: document.querySelector(".heatmap"),
        gradient: {.25: "rgb(0,0,0)", .55: "rgb(140,140,140)", .85: "rgb(216,216,216)", 1: "rgb(255,255,255)"}
    }).setData(d);
    var f = document.getElementsByClassName("heatmap-canvas")[2].toDataURL("image/png"), C = Cesium.RenderState.fromCache({
        cull: {enabled: !0},
        depthTest: {enabled: !0},
        stencilTest: {
            enabled: !0,
            frontFunction: Cesium.StencilFunction.ALWAYS,
            frontOperation: {
                fail: Cesium.StencilOperation.KEEP,
                zFail: Cesium.StencilOperation.KEEP,
                zPass: Cesium.StencilOperation.REPLACE
            },
            backFunction: Cesium.StencilFunction.ALWAYS,
            backOperation: {
                fail: Cesium.StencilOperation.KEEP,
                zFail: Cesium.StencilOperation.KEEP,
                zPass: Cesium.StencilOperation.REPLACE
            },
            reference: 2,
            mask: 2
        },
        blending: Cesium.BlendingState.ALPHA_BLEND
    });
    viewer.scene.primitives.add(new Cesium.Primitive({
        geometryInstances: new Cesium.GeometryInstance({
            geometry: new Cesium.RectangleGeometry({
                rectangle: i,
                vertexFormat: Cesium.EllipsoidSurfaceAppearance.VERTEX_FORMAT,
                height: 200,
                granularity: Math.PI / 36e5,
                outlineColor: Cesium.Color.RED,
                rotation: 0
            })
        }),
        appearance: new Cesium.EllipsoidSurfaceAppearance({
            aboveGround: !0,
            renderState: C,
            material: new Cesium.Material({
                fabric: {
                    uniforms: {
                        image: h,
                        repeat: new Cesium.Cartesian2(1, 1),
                        color: new Cesium.Color(1, 1, 1, 1),
                        bumpMap: f
                    },
                    components: {
                        diffuse: "texture2D(image, fract(repeat * materialInput.st)).rgb * color.rgb",
                        alpha: "texture2D(image, fract(repeat * materialInput.st)).a * color.a"
                    }
                }, translucent: function (e) {
                    return e.uniforms.color.alpha < 1
                }
            })
        })
    }))
}
$(document).ready(function () {
    mars3d.util.webglreport() || (alert("系统检测到您使用的浏览器不支持WebGL功能"), layer.open({
        type: 1,
        title: "当前浏览器不支持WebGL功能",
        closeBtn: 0,
        shadeClose: !1,
        resize: !1,
        area: ["600px", "200px"],
        content: '<div style="margin: 20px;"><h3>系统检测到您使用的浏览器不支持WebGL功能!</h3>  <p>1、请您检查浏览器版本,安装使用最新版chrome、火狐或IE11以上浏览器!</p> <p>2、WebGL支持取决于GPU支持,请保证客户端电脑已安装显卡驱动程序!</p></div>'
    })), initMap()
})</script>
</body>
</html>
4.2 注意事项
这里涉及到的知识点主要包括:
div.toDataURL(“image/png”); 函数;node.parentNode.removeChild(node);通过以上内容改写,将原来的代码重新整理可得 json2heatmap.js 文件:
/**
 * 关于热力图绘制的相关代码
 *
 * Made by Ashinjeoro
 * in 2021-08-31 15:27
 */


/** 悬空热力图的局部变量. */
let _primitive;

/**
 * 根据定义的几何边界生成随机数据点
 * @param e
 * @param t
 * @returns {[]}
 */
function getRandomPoints(e, t) {
    for (var a = [], r = turf.randomPoint(e, {bbox: t}).features, n = 0; n < r.length; n++) {
        let i = r[n].geometry.coordinates, o = Math.floor(100 * Math.random());
        a.push({x: i[0], y: i[1], value: o})
    }
    return a
}

/**
 * 读取地理 JSON 数据进行处理
 * @param data
 */
function read(data){
    let result = [];
    for (let i = 0; i < data.features.length; i++) {
        let feature = data.features[i];
        // 获取坐标数据
        let x = feature.geometry.x;
        let y = feature.geometry.y;
        // 取数据指标
        let value = feature.attributes["外地投资比例___"];
        // 添加数据
        result.push({x: x, y: y, value});
    }
    return result;
}

/**
 * 删除 DOM 中的指定元素
 * @param node
 */
function remove(node){
    if(node){
        node.parentNode.removeChild(node);
    }
}

/**
 * 根据传入数据执行热力图绘制的主体函数
 * @param result 传递的 JSON 数据
 */
function draw(result){
    let data_array_origin = read(result);
    let factor = 0.05;
    // let left = 117.20, right = 117.28, bottom = 39.05, top = 39.09;
    // let left = 117.20, right = 117.28, bottom = 39.00, top = 39.10;
    // let factor = 0.05;
    let left = 117.00, right = 117.80, bottom = 38.80, top = 39.20;
    let rectangle = Cesium.Rectangle.fromDegrees(left, bottom, right, top);
    let pixel_width = turf.radiansToLength(rectangle.width, "metres") * factor;
    let pixel_height = turf.radiansToLength(rectangle.height, "metres") * factor;
    $(".heatmap").css({width: pixel_width + "px", height: pixel_height + "px"});
    $(".heatmap-canvas").css({width: pixel_width + "px", height: pixel_height + "px"});
    for (var data_array = [], max = 0, i = 0; i < data_array_origin.length; i++) {
        let item = data_array_origin[i];
        let pixel_x = Cesium.Math.toRadians(item.x - left)
        let pixel_y = Cesium.Math.toRadians(top - item.y);
        pixel_x = Math.round(turf.radiansToLength(pixel_x, "metres") * factor);
        pixel_y = Math.round(turf.radiansToLength(pixel_y, "metres") * factor);
        data_array.push({
            x: pixel_x,
            y: pixel_y,
            value: item.value
        });
        max = Math.max(max, item.value);
    }
    let data = {max: max, data: data_array};
    h337.create({
        container: document.querySelector(".heatmap"),
        radius: 20,
        blur: .9,
        gradient: {.25: "rgb(0,0,255)", .55: "rgb(0,255,0)", .85: "yellow", 1: "rgb(255,0,0)"}
    }).setData(data);
    h337.create({
        container: document.querySelector(".heatmap"),
        gradient: {.25: "rgb(0,0,0)", .55: "rgb(140,140,140)", .85: "rgb(216,216,216)", 1: "rgb(255,255,255)"}
    }).setData(data);
    let array = document.getElementsByClassName("heatmap-canvas");
    console.log(array.length);
    let heatmap_canvas = document.getElementsByClassName("heatmap-canvas")[1];
    let heatmap_bump_canvas = document.getElementsByClassName("heatmap-canvas")[2];
    let image = heatmap_canvas.toDataURL("image/png");
    let bumbmap = heatmap_bump_canvas.toDataURL("image/png");
    remove(heatmap_canvas);
    remove(heatmap_bump_canvas);
    let render_state = Cesium.RenderState.fromCache({
        cull: {enabled: !0},
        depthTest: {enabled: !0},
        stencilTest: {
            enabled: !0,
            frontFunction: Cesium.StencilFunction.ALWAYS,
            frontOperation: {
                fail: Cesium.StencilOperation.KEEP,
                zFail: Cesium.StencilOperation.KEEP,
                zPass: Cesium.StencilOperation.REPLACE
            },
            backFunction: Cesium.StencilFunction.ALWAYS,
            backOperation: {
                fail: Cesium.StencilOperation.KEEP,
                zFail: Cesium.StencilOperation.KEEP,
                zPass: Cesium.StencilOperation.REPLACE
            },
            reference: 2,
            mask: 2
        },
        blending: Cesium.BlendingState.ALPHA_BLEND
    });
    _primitive = new Cesium.Primitive({
        geometryInstances: new Cesium.GeometryInstance({
            geometry: new Cesium.RectangleGeometry({
                rectangle: rectangle,
                vertexFormat: Cesium.EllipsoidSurfaceAppearance.VERTEX_FORMAT,
                height: 180,
                // granularity: Math.PI / 36e5,
                granularity: 1.0,
                outlineColor: Cesium.Color.RED,
                rotation: 0
            })
        }),
        appearance: new Cesium.EllipsoidSurfaceAppearance({
            aboveGround: !0,
            renderState: render_state,
            material: new Cesium.Material({
                fabric: {
                    uniforms: {
                        image: image,
                        repeat: new Cesium.Cartesian2(1, 1),
                        color: new Cesium.Color(1, 1, 1, 1),
                        bumpMap: bumbmap
                    },
                    components: {
                        diffuse: "texture2D(image, fract(repeat * materialInput.st)).rgb * color.rgb",
                        alpha: "texture2D(image, fract(repeat * materialInput.st)).a * color.a"
                    }
                }, translucent: function (e) {
                    return e.uniforms.color.alpha < 1
                }
            })
        })
    });
    if(_primitive) viewer.scene.primitives.add(_primitive);
}

/**
 * 根据传递的 JSON 数据绘制热力图
 * @param json  JSON 数据
 * @param is_open 是否开启
 */
function json2heatmap(json, is_open){
    if(is_open){
        draw(json);
    }else{
        if(_primitive) {
            viewer.scene.primitives.remove(_primitive);
            _primitive = null;
        }
    }
}